Grade Level
9-10, 11-12Duration
Six weeks, 50 minutes periods
Materials
5-gallon bucket/round trash can, cardboard, masking tape, x-acto knives, plastic grocery bags, newspaper, art paste (flour and water also work for paper mache), paint, and anything else you may want to use for hair and eyes (we used softball-sized whiffle balls).
Media
Sculpture
Lesson Objectives
The objects of the lesson are for students to learn
…how to create an armature through manipulating cardboard into three-dimensional forms.
…how to use additive sculpture on top of the armature with paper mâché to further develop facial features.
…reflect knowledge of the proportions of the human face.
…create expression and character in their Big Heads.
Introductory Activity
In this project, the teacher chose to have students do self-portraits. Other teachers have used celebrities, artists, and other themes.
Have students take pictures of one another (with a partner) using an expression. You will need the frontal view, both profile views, and the back of the head. Make sure that expression does not change so that you can see what it looks like from all angles. Now’s the time to be silly! I printed them in color, but they don’t need to be. Laminate and VOILA… you are ready to rock and roll.
Review basic proportions of the face with students.
Walk the students through the entire process so they have a sense of how these Big Heads will be created.
Lesson Process
1. Students will start with a basic “egg” type head shape constructed out of cardboard. Students are taught scoring (breaking the surface of the top of the cardboard so it bends easily using an x-acto knife) and how to layer curves for the skull. Pieces are attached using tape so that adjustments to the structure can be made easier.
2. Once your piece has the basic armature, tape the heck out of it, inside and out to make sure that your structure is solid. Next, mark out facial proportion lines using a sharpie. Draw correct lines for eye shapes, nose width, lips, and ear placement.
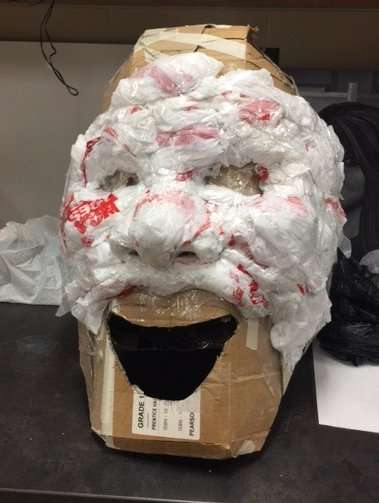
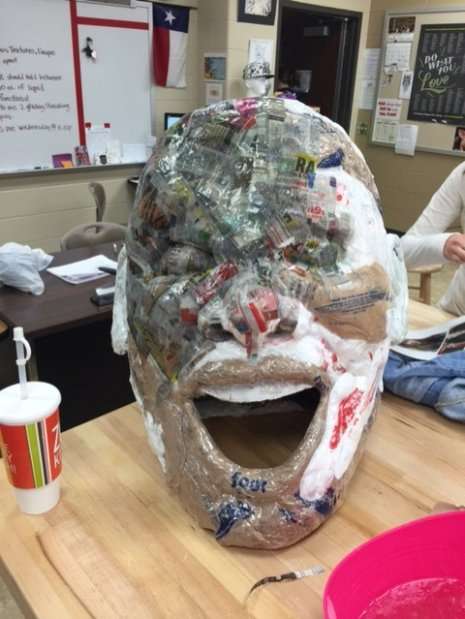
3. Begin building the basic form of the nose with a piece of cardboard. Cut out eye shapes slightly larger than needed and consider your cardboard armature to be the point where your eye sockets would be. This means that students will have to build the actual form of their face (using their picture guide) with plastic grocery bags (newspaper can be used too, but for smoothness, the bags are better). Students will need to also cut out “sight holes” from either their nostrils or their mouth. It depends where it actually sits on their shoulders.
4. Add a round object for the eyes. We used Wiffle balls and cut them in half which made them about $1 a ball! I had the kids bring me $1 so that they could all have one or they brought in their own. Some of the smaller “big head” pieces worked fine with tennis balls as well. Make sure that the ENTIRE head is covered in plastic bags before it is covered in paper mâché or at least covered in masking tape so that no cardboard is exposed.
5. Make a basic shape of an ear from cardboard, drawing the details of the structure. Cut out the areas where there is a good amount of shadow so that you are creating dimension. Add plastic bags to your cardboard ear, trying to make the form as close to your ears as possible. Make sure that when they are attached, you add a little plastic bag wedge behind the ears so that they sit slightly out from the actual head.
6. Next comes paper mache! We use the Elmers art paste and mix it with cold water. Tear strips of newspaper ahead of time and make sure that you are completely submerging your newspaper strip, squeegee it between your fingers, and then press/rub it against your big head, assuring that there are no air bubbles and the edges are sealed. Overlap them slightly as you layer and use as many layers as necessary. I think 3-4 should do the trick!
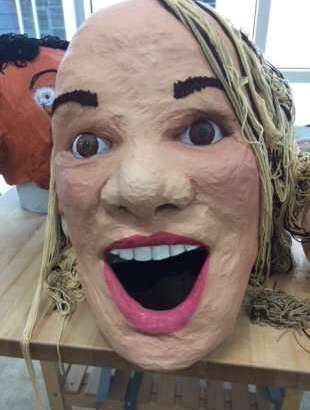
7. After you’re satisfied with your paper mache…the fun begins! Now your students will paint themselves! Demo ways to make skin color, how to paint eyeballs and teeth, etc. Once the Bighead is painted, you need hair! Several students planning to use yarn and a couple are buying cheap clown-type wigs to make their hair curly. I have seen black trash bags braided for dreads and will keep brainstorming other “hair” ideas for the head, eyebrows, and lashes.
Vocabulary
proportion, scoring, figurative sculpture, additive sculpture. assemblage, paper mâchéResources
big head | Artsy Dork
The BIG Head Project – Valerie White: Visual Arts
33 Big Head Project ideas
Author & Website/Blog
McKenzie Grimm
Supporting Images

